Nursery: Summary of Recommendations
The selected area for a nursery should be on flat to gently undulating terrain, accessible with good road conditions and not prone to flooding.
The preparation of nursery area should be carried out through proper designing of nursery, clearing, fencing and lining.
The ordering of seeds should be scheduled appropriately over a period of time to ensure that adequate labour is available to handle each batch of seeds received and for field planting.
The selection of single or double stage nursery should be decided based on the area to be planted and the size of the nursery.
The nursery practices/maintenance including watering manuring, culling, pest and disease control and weeding should be closely supervised to ensure that all operations are on time and correctly implemented.
Herbicides and equipment for herbicides spraying should be clearly marked and stored separately from pesticides and foliar fertiliser to prevent contamination or incorrect chemical selection. Mistakes in this operation are usually costly and difficult to undo hence should be avoided at all costs.
Nursery: Maintenance
Watering
The most important factor in achieving good success in the nursery is the availability of sufficient water to ensure optimum growth of the seedlings. More often than not inadequate watering is the root of pest and disease problems in the nursery as the seedlings would be at a weaken stage and therefore more prone to pests and diseases. A good indication of inadequate watering in the nursery is the incidences of collante and blast disease.
Poor or uneven coverage of the irrigation system may also lead to seedlings of poor uniformity. This is a very common fault in nurseries. Watering must be done daily including holidays.
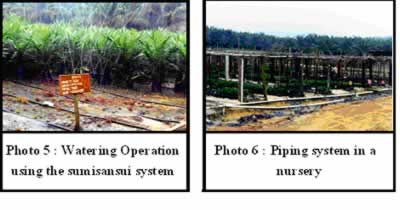
With the current technology of irrigation system in the nursery either by overhead sprinkler system (OSS) or lay flat sprinkler tubes (e.g. Sumisansui, photo 5 & 6), the watering should be carried out twice a day for 45 minutes each time, to supply 8mm of water daily. A rain gauge may be used to check whether the amount of water supplied is sufficient.
Manuring
It is well established that the fertiliser rates for nurseries require adjustment to varying management practices and according to different soil types (Hew & Toh, 1973). However the recommendations and system described in this paper are based on sandy clay loam, inland soils for general usage and on conventional fertilisers or controlled/slow release fertilisers.
Manuring programme based on conventional fertiliser
Fertilisers are not required until one complete new leaf has appeared (4 -5 weeks after planting). Use of conventional fertiliser should preferably be confined to small nurseries for field plantings of less than 50 ha or areas with adequate labour. The programme is given in Table 2 below:
|
Seedling age
|
Table 2. Conventional fertiliser manuring programme
|
||
|
(Weeks)
|
(Months)
|
||
|
Pre nursery stage
|
5-8
|
2
|
Weekly drench with a soluble foliar fertiliser (formulation of 22:22:10:1) at 15 g in 4 litres water for 100 seedlings.
|
|
9-12
|
3
|
Weekly drench with a soluble fertiliser (formulation of 22:22:10:1) at 15 g in 4 liters water for 25 seedlings.
|
|
|
Main nursery stage
|
13 – 16 (transplanting) |
4
|
Mix 100g RP/bag in soil medium for large bags. After transplanting no solid fertiliser application for 4 weeks but continue weekly fertiliser drench as for 3rd month
|
|
20
|
5
|
5 g CCM45/bag. If seedlings are chlorotic, continue weekly foliar drench as for 3rdmonth. Drench with HGFB solution*
|
|
|
24
|
6
|
10 g CCM45 and 10 kieserite/bag
|
|
|
28
|
7
|
15 g CCM45. Drench with HGFB solution*
|
|
|
32-39
|
8-9
|
20 gm CCM45
|
|
|
40-47
|
10-11
|
30 g CCM45
|
|
|
48
|
12
|
35 g CCM45
|
|
|
>52
|
>13
|
30 g CCM45 + 15 g kieserite
|
|
*Dissolve HGFB48 at 1 g/10 litres water for 7 months old and younger seedlings. For seedlings of 8 months and older, use a rate of 3g /10 litres water. The seedlings should be drenched with the HGFB solution at a rate 500ml/seedling.
Fertiliser application
For foliar application, the drenching of the seedlings with foliar fertiliser solution should be carried out early in the morning or late afternoon. As far as possible, the whole seedlings should be wetted and no watering of the seedling should be carried out for the day of application. However High Grade Fine Borate Compound ( HGFB ) solution application for large polybags should be done after normal watering.
For solid application, the compound fertiliser should be weighed to obtain the correct rates, and calibrated applicators (e.g. scoop, spoon, etc.) given to the workers to ensure that the correct rates are applied. The fertiliser should be evenly distributed on the surface of the polybag soil at least 2-4 cm away from the base of the seedlings. The application of solid fertiliser should be carried out when the seedlings are dry, i.e. in the morning before watering, or in the afternoon after the morning watering.
Good supervision of all fertiliser applications is necessary to obtain full benefits from the inputs.
Manuring programme based on slow release fertilisers
There are many types of slow release fertiliser (SRF) currently available in the market. The SRF selected for use should supply the required nutrients at the right time and amount to the seedlings for good growth.
Fertiliser rate
The general recommendation for use of SRF in the nursery is provided in Table 3 .
|
Seedling age
|
Table 3. Slow release fertiliser (SRF) manuring programme
|
|
|
(Weeks)
|
(Months)
|
|
|
1 – 12 |
3
|
Follow manuring programme for conventional fertilizer or 7.5g SRF per seedling
|
|
16 |
4 |
75 g SRF per seedling
|
|
20
|
5
|
15 g kieserite. Drench HGFB at 5th & 7 month.
|
|
40 – 48
|
10 – 12 |
30 g CCM45/seedling/mth.
|
Fertiliser application
The SRF should be spread evenly and buried at 10 cm below the soil surface.
Supplementary fertilisers should be applied from the 9th month onwards or even earlier if the seedlings show symptoms of deficiencies like yellowing, etc.
Corrective fertiliser application
With the use of SRF, it is essential to monitor the colour and growth of the seedlings regularly due to the long interval without any other fertiliser application. In cases of wrong or inadequate application as indicated by seedling colour and vigour, fertiliser supplementation is required as per conventional fertiliser programme for the appropriate seedling age provided in Table 2.
Culling
Culling is one of the most important procedures to be carried out in the nursery to ensure that only the most uniform and vigorous palms that are likely to give the highest yields are planted in the field.
Four rounds of culling are recommended during the nursery period. In addition, a final round of selection should be done just before field planting.
Culling in the pre-nursery stage
Culling at the pre-nursery stage is carried out at month 2 and prior to transplanting the main nursery at around month 3 to 4.
This is one of the main advantages of the double stage nursery system where the first stage culling of undesirable palms can be done stringently and quickly over large number of young seedlings. The main types of undesirable seedlings (should be culled) at this stage are as follows: narrow (grass leaf), rolled leaf, twisted leaf, crinkled leaf, collante and stunted or weak (runts) palms. Allow for 10 to 20% culling at this stage.
Culling in the main nursery
Culling in the main nursery should be carried out when the seedlings are 7 months and 9 months old while the fronds of neighbouring palms have not started to overlap and etiolation not set in to mask the runts. The typical characteristics of abnormal seedlings in the main nursery are as follows: –
Erect, flat top, broad pinnae, narrow pinnae, wide internodes, juvenile (slow to pinnate), weak and slow growing (runts), crinkled leaf, collante, chimaera, badly diseased (helminthosporium, curvularia, blast, crown disease) and palms badly damaged by chemicals.
The final round of selection based on uniformity and vigour should be carried out just before the seedlings are being loaded onto lorries/tractors for transport into the field. If planting is delayed the final round of culling must be carried out before etiolation sets in. Allow for 5 to 10% culling and selection for the main nursery.
Timely culling rounds will ensure the unnecessary keeping of unwanted seedlings and reduce costs in the nursery.
Recording
Accurate records of discarded seedlings are necessary to ensure that adequate seedlings are available for field planting and supplies.
Pests and Disease Control
This is another important aspect in oil palm nursery management. Pest infestations and disease infections can cause alarming damage and losses if not recognized at an early stage and brought under control quickly. Most pest and disease problems can be avoided by correct agronomic and management practices, but where they are unavoidable, early detection and prompt control measures are crucial.
Common pests and diseases in the nursery
Common pests in nursery are red spider mites, leaf-eating caterpillars, cockchafers, grasshoppers and rats. The common diseases are mainly fungal leaf diseases like curvularia, cercosporium and helminthosporium.
Pest and disease control
There are a number of measures which if implemented can assist in reducing the incidence and severity of pest and disease attack in the nursery. The key to good P and D control is vigilance and prompt action to contain the problem.
Prophylactic spraying
Routine prophylactic spraying is not necessary if the seedlings are growing vigorously and the nursery is well managed.
However, where nursery palms are sub-optimal in growth and vigour, fortnightly prophylactic spraying of fungicides and insecticides may be carried out until palms return to normal growth.
Pesticides may be mixed with foliar fertilizer mixtures in a single application but these should be confirmed with the supplier if in doubt.
Spraying should preferably be carried out in the evening after the last watering.
Training of nursery workers in pest and disease recognition
It is certainly worthwhile to train nursery workers to recognise the symptoms of common pests and diseases in the nursery and report them. This outbreak reports by people who are working full-time in the nursery will provide an “early warning” system to the management.
Weeding
Weeds in the nursery area should be eradicated since some weeds may harbour pests or are hosts for diseases. It is necessary to keep the polybags completely free of weeds that would compete for nutrients, moisture and sunlight. Ideally the nursery should be weed-free.
Weeding in the pre-nursery stage
In the pre-nursery where seedlings remain for only 12-16 weeks, very little weeding is required. When necessary, hand weeding in the inter-bed paths and within the small polybags should be carried out monthly.
It is generally recommended that all herbicides be avoided at this stage in view of the fact that any error can lead to serious seedling damages or losses.
Weeding in the main nursery stage
Mulching with palm kernel shells can greatly suppress the growth of weeds in the large polybags and any weeds appearing can be quickly and easily hand-weeded.
However, weeds on the ground and surrounding nursery area should be eradicated through chemical spraying as and when required. Only contact herbicides eg. paraquat should be used.
Storage of Chemicals and Equipment
The control of chemicals in the nursery is of the greatest importance. Many instances have occurred of herbicides being incorrectly utilised by mistaking them for insecticides or fungicides. In view of this problem it is strongly recommended that the estate have a separate nursery store and within the store, herbicides are kept separated from pesticides/foliar fertilizers in lockable cupboards. It is also important that nursery equipment used for spraying pesticides and herbicides be also clearly marked and kept apart in separate storage compartments to avoid costly mistakes of cross contamination. They should only be used in the nursery. Empty herbicide and pesticide containers should be discarded and not reused.
Nursery: Set-up
The decision to have a single stage or double stage nursery will be a matter of personal choice depending on the specific situation encountered e.g. a double stage nursery is advisable for a large scale planting (>500 ha).
The Single Stage Nursery
This system utilises only large polybags and the germinated seeds are planted directly into the bags in the same manner as planting out in the pre-nursery polybags as described in section on planting germinated seeds into the large polybags.
Some of the advantages of this system are:-
-
once the seed has been planted, there is no further movement until field planting so that the root system is not disturbed and therefore establishment and growth is faster.
-
one can dispense with all the requirements in terms of layout, equipment and labour of the pre-nursery.
However this system has a number of disadvantages: –
-
it is necessary to have the full nursery infrastructure ready from the initial seed delivery.
-
it requires greater volume of water and additional engine fuel, wear and tear for the first two or three months.
- it also requires more soil since all the culling is done at the large polybag stage.
-
it is more difficult to observe and supervise when the seedlings are spread over a large area.
-
there will be no space for receipt of the following year’s seed delivery in case of delays in any one year’s planting programme unless the nursery is enlarged.
-
culling and seedling replacement is cumbersome.
-
it is not advisable for large scale planting which requires a very large area to prepare and also involves high cost.
-
difficulty in providing proper shading to the germinated seedlings at planting.
The Double Stage Nursery
The double stage nursey system involves planting of the germinated seeds in small pre-nursery polybags packed closely together in a very small area for the first two to three months. The seedlings are then planted out in the large polybag nursery where they remain for a further 7-9 months before field planting. This system has a number of advantages over the single stage nursery such as:
-
only a small section of nursery is required for the first 2 to 3 months.
-
less irrigation required for the first 2 to 3 months.
-
easier to observe seedlings and supervise nursery work during the critical early stage (2 to 3 months after planting).
-
culling can be carried out very quickly and easily at the first stage before planting into large bags.
-
the double stage nursery also has some disadvantages namely:
-
an “extra” operation is created which is very labour intensive.
-
possible slower growth compared to the single stage especially with poor shade management.
-
poor transplanting technique from small to large polybags could give rise to severe transplanting shock.
NURSERY SET-UP (Double Stage Nursery)
Since the double stage nursery is commonly adopted in most of the estates, only this type of nursery is described.
The Pre-Nursery Stage
Polybag filling and placement
Polybags must be filled with soil up to the bag rim and placed in the nursery beds at least four weeks before the planting date to allow settling, topping up with soil and pre-planting irrigation.
Only the best topsoil available should be used in any nursery. The soil must be free draining, friable, sandy clay loam (eg. Rengam, Serdang, Bungor) and free from contaminants (chemicals etc.). Rock phosphate (RP) (@ 10 kg/1000 small polybags of 15 cm (6 in) x 21 cm (9 in) x 250 gauge) must be premixed into the soil prior to filling to ensure adequate P availability.
The polybags should be turned inside out before filling so that they sit upright. Hoppers or funnels may be used to facilitate filling. The filled polybags should be arranged in beds of 10 bags width and of a convenient length. The beds should have wooden side frames to prevent bags from toppling over. The arrangement of polybags at pre-nursery stage is shown in photo 1.

Shading
At this critical stage it is necessary to shade the plants either with palm fronds on frame, or with shade netting of 70% shade. If oil palm fronds are used as shade it is necessary to pre-spray the fronds with a pesticide to ensure that they are not instrumental in introducing any pests or diseases. The shade should be gradually reduced after the first month and should be totally removed by the end of the second month. The shading in the pre-nursery stage using oil palm fronds and netting is shown in photos 2 and 3 respectively.

Planting germinated seeds into the polybags
It is essential to ensure that polybags are well watered just prior to the commencement of planting. Planting of germinated seeds should be completed as soon as possible, preferably not later than 1 day after receipt.
Care must be taken to ensure that the workers can differentiate between the plumule (shoot) and the radicle (root) to avoid planting the seeds upside down. The seed should be planted at 1 cm depth with the radicle pointing down and lightly covered with soil. Planting holes can be made with a stick.
Where the germinated seeds are consigned as identified families and labelled accordingly by the seed producer (as for AA DxP seeds), they are to be planted according to the same families and properly labelled right to the main nursery. This is to facilitate nursery culling, as the seedlings from the each family would be more uniform and the off-types readily spotted. However in the field planting, the seedlings are to be planted as mixed families.
Once the planting is completed, the identification tag must be stapled to the edge of polybag.
The Main Nursery
Polybag filling
Again, only the best topsoil is to be used in the large polybags . Prior to polybag filling, a basal application of 100g RP/polybag must be thoroughly mixed with the soil before filling.
Filling of the polybags should commence at least a month prior to the transplanting. Bags should be filled to the rim and set aside for a few weeks to allow for settling and soil topping up where necessary.
The large polybag of 38 cm (15in) x 45 cm (18in) x 500 gauges should be turned inside out before filling, to give the filled bag a stable and level base.
Hopper or funnels may be used for more efficient filling especially in large-scale nurseries.
Spacing of bags
Spacing of polybags in the nursery is done to minimise light competition between palms and for easy access to the palms for pest and disease control, weeding and manuring. The spacing and placement of seedlings at main nursery stage is shown in photo 4. The spacing of seedlings depends on the duration seedlings are expected to be kept in the nursery. The recommended spacing for various seedling ages at field planting is given in Table 1.
|
Table 1: Recommended polybag spacing in the nursery for various seedling ages at field planting
|
||
|
Age of seedling at field planting (months)
|
Triangular spacing of polybags in the nursery
|
|
|
(m)
|
(ft)
|
|
|
09-11
|
0.75
|
2.5
|
|
11-13
|
0.91
|
3
|
|
13-18
|
1.25
|
4
|

Transplanting from pre-nursery into large polybags (main nursery)
Prior to transplanting the seedlings to the large polybags, workers should prepare the planting holes within the bags. These holes can be prepared using core-borers. The pre-nursery seedlings should be given a thorough watering before the transplantings. To minimize disturbance of the roots, the bags should be cut open with a small blade and the seedling removed gently without disturbing the soil. The detached seedling together with the soil is placed in the planting hole of the large polybag, and the soil gently but firmly compacted around the root mass. Care must be taken to ensure that the planting is level with the pre-nursery soil level. A good watering should follow immediately. Mulching of the soil surface should be done with oil palm kernel shells.
Nursery: Ordering of Seeds
Placing of Orders
Seeds are usually ordered well in advance of requirement. It is normal to place tentative orders at least one year before delivery subject to confirmation at a date closer to delivery. Delivery must be spread out to provide time for planting out at the optimum age.
Source of Seeds
All germinated seeds, or any other planting materials, should only be purchased from reputable suppliers. Wherever possible seeds should be purchased direct from SIRIM registered producers to be ensured of legitimate and good quality seeds .
Quantity to Order
In determining the quantity to be ordered , the culling rates and various losses (in the nursery and field) will have to be considered in addition to the total palms required in the field. Based on general experience, 175 germinated seeds (27% more) per hectare are sufficient if the field stand is 138 palms per hectare. For a stand of 148 palms/ha, the requirement would be 186 germinated seeds.
Nursery: Site Selection and Preparation
SITE SELECTION
The selection of the area for a nursery is critical and it should be sited as centrally as possible to the field(s) to be planted. In addition, the following should also be considered:
Topography (Terrain)
The selected area should be flat to gently undulating with slopes between 0 and 30 and preferably, with a reliable/permanent source of water supply for irrigation purpose.
Water Supply
Water requirements (quality and quantity) must be determined prior to starting site preparation. The easiest source of water is where there is a large natural pond or lake whereby all that is required is to place an intake pipe to connect with a pump unit. A back-up system should be considered, particularly in isolated areas or areas of lower or unreliable rainfall.
Drainage
The site chosen should not be prone to flooding, which will damage seedlings and buildings (stores).
Area
To achieve good growing conditions with minimal risk of etiolation, a main nursery planting density of 13,800 polybags per ha with 0.91m(3ft) x 0.91m(3ft) D planting is recommended excluding allowance for accessibility. The spacing should be increased by another 0.15m (0.5ft) if the seedlings are anticipated to be kept in the nursery for longer than 12 months.
Accessibility and Nursery Roads
Roads within the nursery and their alignments will need to be carefully planned and laid out depending on the placement distance of the polybags and the type of irrigation to be utilised. Access roads to the nursery should be sufficiently wide to allow vehicles to manoeuvre during peak planting periods to facilitate supervision and movement of materials.
SITE PREPARATION
The preparation of the area for a nursery is important to allow optimum seedling growth, maintenance of nursery site, unimpeded access and to provide hygienic conditions for plant growth. Four main activities are involved in preparing a site for nursery, namely nursery design, clearing, fencing and lining.
Nursery Design
A well-designed nursery allows for access of many vehicles during evacuation of seedlings for field planting especially for large-scale plantings. This objective can be achieved through the drawing up of a plan to show all paths, roads and irrigation points. An example is shown in Figure 1.

Clearing
With the boundaries determined, felling and clearing should be carried out at least 2 months before the arrival of the seeds. Once clearing is completed, proceed to fence the area, fill the polybags and install the irrigation system.
Fencing
The major types of fences utilised for nurseries are the conventional barbed wire fence and the electric fence.
The Conventional Fence
The specifications for the conventional fence depend on the species of animals that it is required to keep out. For example, a four-strand barbed wire fence, with wires spaced at 0.3, 0.6, 0.9 and 1.2 m from ground should be adequate to control cattle and goats.
Electric Fencing
Where there is threat of wild mammalian pests, an electrical fence is possibly the best form of defence. Wires of 250-300 kg breaking strain have been found to be the most suitable. The heights at which the electrified wires are placed above ground level are critical, being dependent on the mammalian pests to be kept out, e.g. 10 cm to repel porcupines.
Lining
Lining is carried out to space the polybags evenly in the nursery, so that seedlings have good and uniform access to sunlight and to achieve the most cost effective irrigation system .
Polybags are lined at 0.91m (3 ft) x 0.91m (3 ft) triangular spacing to give each seedling the optimum growth space. All seedling rows must be straight along the axis at 60o to each other and parallel to irrigation lines.
In the Sumisansui irrigation system, MK II tubes are laid down between the polybags at every 4 rows, a 1 m wide path is provided at every 8 rows for easy access. When the seedlings are about 7 – 8 months old, additional MK II tubes are added between the existing MK II tubes to give a final layout of 1 tube for every 2-seedling row. This is illustrated in Figure 2.

Oil Palm: Nursery
NURSERY PRACTICES FOR PRODUCTION OF SUPERIOR OIL PALMPLANTING MATERIALS
Introduction
Site selection and preparation
Ordering of seeds
Nursery set-up
Nursery maintenance
Summary of recommendations
The oil palm is a very precocious crop, which comes into maturity at 25 months or earlier from field planting, with peak yield realized at four or more years thereafter.
As early bearing and high yields in the field are mainly dependent on production of uniformly good and healthy seedlings from a nursery, it follows that good nursery management would be required to achieve the latter.
The production of superior oil palm planting materials is fully dependent on attention to details at all stages in the nursery management and this entails following closely, proven standards and procedures.
Reference
Heriansyah and Tan C.C. 2005. Nursery practices for production of superior oil palm planting materials. The Planter. Incorporated Society of Planters, Kuala Lumpur 81 (948) : 159-171
Note: The full list of references quoted in this article is available from the above paper.